
What is Editor.exe?
You probably noticed that in the previous tutorial, we mentioned nothing about several features in fangame creation which are seemingly essential. Things such as adding Pokémon, creating Trainers, making items, to name a few. None of these can be modified directly using RPG Maker XP, and were thus left out of the previous tutorial. So how do we edit them?
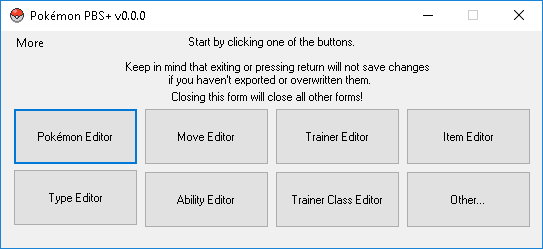
Open up your game folder and run Editor.exe. That’s the program we’re going to be using to edit our game’s metadata. If you’re following along, I also recommend giving M3rein’s program PBS+ a try. We’ll get to what that does later in the article.
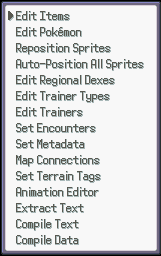
Editor.exe pops up a menu like this when opened. The list contains fifteen functions that we’re going to be using to customize our game. In this tutorial, we’re going to delve into what each one does. Before that, however, we need to take a quick detour to talk about a particular type of file.
Go back to your game folder and let’s delve into the PBS folder inside it. This contains a list text files that store much of the information needed by the game – have a look at types.txt and you’ll see a list of every Pokémon Type in the game, its name, strengths, weaknesses, and a field called Internal Name that refers to the string used inside the game code to refer to that type. These files are what the Editor.exe program writes its changes to, and they are typically called PBS files.
It’s worth noting that not all PBS files can be modified through Editor.exe. We used the example of types.txt earlier, and you may have noticed that an Edit Types function is absent from the editor. If we want to modify our types, we’ll have to edit the file directly, or use the PBS+ program mentioned earlier. First though, let’s have a look at the functions that are available through the default Editor.exe.
Edit Items
Used to modify the names of items, when they can be used, the Bag pocket in which they’re stored, and a price and description. This can’t be used to modify the effects of the item – that’s stored in RMXP’s Script Editor and requires Ruby knowledge to modify. If you’ve already got some programming expertise, check out the script file PItem_ItemEffects to modify what each item does, otherwise we’ll cover it once we get into scripting in a later tutorial.
Edit Pokémon
This is quite similar to editing items. Every aspect of each Pokémon can be modified through here – most of these fields should be pretty familiar. A few things in here are worthy of comment, however. Firstly, RegionalNumbers cannot be modified. You’ll need to use the Edit Regional Dexes function for that.
Second, there’s an option to set multiple forms of a Pokémon. As with item effects, new forms cannot actually be modified through this program, and are instead stored in the Pokemon_MultipleForms script file.
Finally, you’ll notice several fields for Battler Altitude. This affects the co-ordinates on which the game displays Pokémon sprites in battle. This too can’t be modified here.
Reposition Sprites
This is for modifying the Battler Altitude field we just mentioned. It provides a user interface for aligning sprites with the battle’s platforms, although this mockup will look broken in cases where a plugin like the Elite Battle System has been installed.
Auto-Position All Sprites
Automatically sets all Pokémon’s Battler Altitudes to a value defined by certain calculations performed on their sprites. This should only be done in unison with manually fine-tuning the sprites afterwards, as it has a tendency to mess up certain things like flying Pokémon’s sprites.
Edit Regional Dexes
Can create new Regional Pokédexes or add Pokémon to existing one. Be sure to liberally use the save button when editing Dexes, as this tool does not autosave and recreating Pokédex entries can be extremely time-consuming.
Edit Trainer Types
Allows you to create and modify trainer types, or trainer classes. You can give them default music that will play at specific times when battling them, as well as changing their Skill level to affect their Trainer AI.
Edit Trainers
Rather self-explanatory! Trainers can have up to six Pokémon and eight items, but will only use basic battle items (like Potion variants) that their AI knows how to utilize properly. You can also set a Battle ID, which is used to distinguish between Trainers with the same name and type – for example, a Rival or other recurring Trainer who is battled multiple times.
Set Encounters
First, you’ll need to choose a map. Once you’ve done that, you can set the wild Pokémon that will appear in the map, and their respective rarities. The most important encounter types are of course, Land, Cave, and Water, but the Editor also lets you set rarer encounter types such as headbutt trees and bug catching contests.
Make sure you’ve set the Map Density before you’re done! This defines the overall frequency of random encounters.
Set Metadata
A map’s metadata means any data that’s not a part of the map file itself. This allows you to set fields such as the map’s weather, the background image for battles, and whether to display the area sign when entering the map.
Map Connections
This one’s fun! You can drag your maps around to connect them and allow the player to move seamlessly between them without needing a warp event. Press F5 to display a list of the controls.
Set Terrain Tags
Terrain Tags are something we explored briefly in our previous tutorial. We found that we can edit them through RPG Maker XP’s database menu. So why are they also in the external Editor?
Well, it turns out the database menu doesn’t let us use as many Terrain Tags as we want. RPG Maker’s default interface limits you to eight (zero to seven) Terrain Tags, and even though Pokémon Essentials adds more, there’s no way to edit them through RPG Maker’s default interface. Because of this, if you’re editing Terrain Tags with a number higher than seven, you’ll need to use the Editor instead, which gives you a huge 99 terrain tags to play around with.
Remember that we’ll be looking into how exactly to code custom functionality for different terrain tags in a future tutorial!
Animation Editor
This is quite a complex editor that we use to create new move animations. To create a new animation, you’ll need to import an animations sheet (from the Graphics/Animations/ folder) and then you’ll be able to manually manipulate each sprite from the animations sheet, each frame. You can also create motion tweens (short for “between”) which essentially tells the program to automatically generate an animation to move the sprite between two specific points.
As with map connections, press F5 to view keybinds and basic help info.
Extract Text
This pulls all text and speech from the game and dumps it into an intl.txt file in the game’s root folder. This can be used for localizing the game – every line of text in the game is copied twice into the file, and by translating the second version of each line you can create a second language pack for the game!
Compile Text
Once you’re done translating, press this! It’ll turn your txt file into a dat file. After it’s done, rename it to the name of the language in question, and move it into your /Data/ folder. After that, you’ll need to open RPG Maker, press F11 to open the script editor, and add the name of your new language file to the LANGUAGES array constant. Congratulations, your game is now working in multiple languages!
Compile Data
This reloads the editor by checking all PBS files for changes.
Is there a faster way?
For many purposes, Editor.exe is extremely slow to use. Most menus do not permit the use of the mouse or scrollwheel, forcing you to use the arrow and page up/down keys to navigate through interminable lists. There has to be a better way to modify these fields.
There is! Introducing PBS+ by M3rein. It’s a brilliant little program made to facilitate PBS file editing. Simply download it from the link, install it, and drop it into your game’s root folder.
PBS+ doesn’t have all the features of Editor.exe – for example, it lacks an animation editor. However, for basic tasks, it’s much quicker than the latter. It allows you to use mouse controls, the keyboard to type in list items directly rather than scrolling, and proper menus and tabs.
We won’t be going into PBS+ in detail because all the fields are the same as those we already talked about in the previous section, and the program itself is thankfully very intuitive and easy to use. Be sure to credit M3rein and PinkFluffyDragon if you decide to use PBS+ to edit your game!
Conclusion
We’re now two tutorials down! By now, we’ve learned the basics of RPG Maker and Pokémon Essentials, as well as how to use Editor.exe or PBS+ to modify metadata that cannot be set directly through RPG Maker. This concludes the general tutorials – from here on, we’ll be going into specifics. Join me next time as we begin learning about mapping!
Edited by SirBoglor and Volpe Artica.
Source: Daily.pokecommunity